Friday, April 15, 2011

[HLSL] Parallax Mapping Tutorial

If you don't have a clue what Tangent Space is about, read this.

This time, Parallax Mapping will be discussed.

Theory
Well, what is a Parallax supposed to be anyway? It's quite a common phenomenon. Actually, it's so common most people wouldn't even notice it as anything out of the ordinary. Let's take a spedometer as a common example for people not sitting behind the steering wheel.

Let's suppose dad's driving at 100km/h. His spedometer also shows that amount more or less. But mom sitting next to him, will see him driving a tad slower. Why, you might ask? Well, it's because dad's viewing the spedometer from the front, so the pointer will sit on top of '100'. From the point of view of mom, it'll be hovering above, let's say, 95km/h. This is because she is viewing it at an angle and there's a depth difference between the needle and the text.
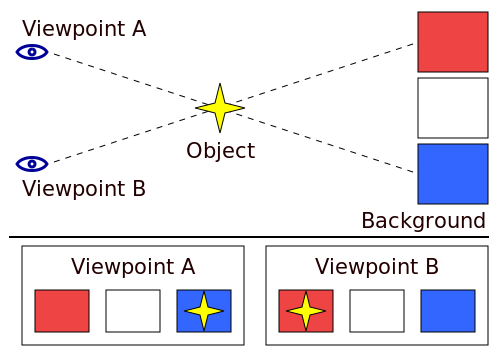
Moving from A to B, passing a static Object,
will make the background appear to be moving
Let's agree that a parallax effect occurs when viewing nearer (foreground) objects at a changing angle. The background were an objects is in front of will change depending on viewing angle. This will lead to us thinking the background is moving with us, because we're seeing different portions of the background next tothe same object:.

Luckily, this effect will be automatically implemented and hardware accelerated in 3D space for us.

But what about textures? They too are 3D worlds, but flattened by our limited camera sensors translated to 2D, lacking parallax, and thus looking fake: objects that were positioned far away from the camera will move at the same speed as nearer ones for the viewer because of lack of depth.

Programming
Looks like we want to bring parallax and thus 3D back into our textures. Remember the variables needed for it? Yep, depth and viewing angle. More depth means more parallax, more angle means more parallax too.

We can get depth from a regular heightmap, that's no problem at all. As the heightmap has the same texture coords we can sample from it as we would do with a regular color texture:

// a snippet from inside a Pixel Shader.
// coordin is the interpolated texture coordinate passed by the Vertex Shader
// heightmapsampler is a standard wrap sampler, which samples from a generic height map
float height = tex2D(heightmapsampler,coordin);

// what we also need in the Pixel Shader is the viewing direction.
// As we're doing calculations relative to our surface (Tangent Space)...
// we need to transform it to texture space. If you don't know what tbnMatrix
// is, read the tutorial over here.


/* VERTEX SHADER
outVS.toeyetangent = mul((camerapos - worldpos),tbnMatrix);
*/


// PIXEL SHADER
float3 toeyetangent = normalize(toeyetangentin);


// The only thing we're doing here is skewing textures. We're only moving 
// textures around. The higher a specific texel is, the more we move it. 
// We'll be skewing in the direction of the view vector too.


// This is a texture coordinate offset. As I said it increases when height
// increases. Also required and worth mentioning is that we're moving along with
// the viewing direction, so multiply the offset by it.
// We also need to specify an effect multiplier. This normaly needs to about 0.4
float2 offset = toeyetangentin.xy*height*0.04f;
texcoordin += offset;


In its most basic form, this is all you need to do Parallax Mapping working. Let's sum things up, shall we?
  • Textures lack depth. Depth is necessary to bring back a 3D feel to it.
  • An important part of the depth illusion is Parallax. We want to bring it back into our textures.
  • To do that, we need to obtain texel depth and the viewing direction. The viewing direction needs to be supplied in Tangent Space to the pixel shader.
  • To do that we need to supply normals, binormals and tangents to the vertex shader. Combining these to a matrix and transposing it gives us the opportunity to transform from world to texture space.
  • Then supply texture coordinates and the tangent space view vector to the pixel shader.
  • Then sample depth from a regular heightmap. Multiply it by the view vector.
  • And tada, you've got your texture coordinate offset. You're then supposed to use this texture coordinate for further sampling.
Let's post a couple of screenshots then. First the one without any parallax mapping.


Now it does include a Parallax Map. It uses a multiplier of 0.4 and a single sample.


Yes, a single sample is all you need. No need to do PCF averaging or anything. Just a single tex instruction per pixel. But as you can see in the latter picture, there are some minor artifacts, especially on steeper viewing angles. To partially fix this, you need to include an offset constant, like this:


float2 offset = toeyetangentin.xy*(height*0.04f-0.01f);
texcoordin += offset;


With this result:


Well, that's pretty much all there is to it. Have fun with it!

Monday, April 4, 2011

[Direct3D] Handling Lost Devices

Hello and welcome to another topic about 3D programming.

Let's suppose we're programming in Direct3D9.

Today I'll be talking about one of the most annoying problems found in 3D applications: lost devices.

Lost Devices
First things first: what's a lost device anyway? When a device goes in a lost state it means it can't place it's results anywhere. It then isn't able to put it's buffers to any place on screen. This might happen when a user Alt Tabs out of a fullscreen game for example: the GPU then can't place it's frames anywhere anymore, so it becomes lost.

Lost devices can't be fully accessed by the Direct3D API anymore. For example, draw calls will return D3DERR_INVALIDCALL instead of D3D_OK (success). This means you can't tell the GPU to do anything useful anymore. To get it working again, you need to reset it.


Resetting your GPU Card
Just to assure you, you don't need to reset your PC or anything, you only need to empty it's memory manually by software (API). Remember, most of Direct3D's API isn't working anymore. There's just about five calls we can make:
  • devicepointer->TestCooperativeLevel(). Think of this one as a doorbell. No one coming at the door (not returning D3D_OK)? Your GPU is lost.
  • devicepointer->Reset(). This one will wipe GPU RAM and reset all States you've set (like SetRenderState and SetSamplerState).
  • resourceinheritingfromIUnknown->Release(). You need to tell the GPU you don't need resources in GPU RAM anymore with this function. You can't even forget a single resource pointer: it will make your app crash when reseting.
  • resourcebackedupincpuram->OnLostDevice(). Call this on any object that has a backup in CPU RAM.
  • resourcebackedupincpuram->OnResetDevice(). Call this on any object that has a backup in CPU RAM.
As I've said, you need to empty the GPU's memory before you can reset it. One minor note first though: as any experienced PC user does *cough* you make backups *cough*:
  • Resources put in D3DPOOL_DEFAULT are no-backup resources and can be found in the best RAM possible (GPU RAM). If we run out of GPU RAM, we put it in CPU RAM. If we can't store it there, leave it on the drive, crash, or put it in Page File. Clear enough.
  • But we've also got D3DPOOL_MANAGED. These resources are copied to CPU RAM, and only when needed they get copied (not moved) to GPU RAM. This means there's always a backup available of these resources.
Let's put together a TODO-list of our reset then. What needs to be done is (in this order):
  1. Release() any resources that are stored in GPU RAM (D3DPOOL_DEFAULT).
  2. Put any resources that are stored both in GPU RAM and in CPU RAM (D3DPOOL_MANAGED) on hold and remove them from GPU RAM. Do this by calling OnLostDevice() on them.
  3. Reset the device with devicepointer->Reset(D3DPRESENT_PARAMETERS).
  4. Then tell all resources backed up in CPU RAM to copy back to GPU RAM by calling OnResetDevice() on them.
  5. Recreate your resources that were put in D3DPOOL_DEFAULT.
An example
Let's say we've got ourselves a basic engine with the following resources:
  • A GPU font, called ID3DXFont, used to draw our tooltip text on the GPU.
  • The FX Framework, called ID3DXEffect, used to modify shader parameters.
  • A shadowmap (color + depth), created by CreateTexture and CreateDepthStencilSurface. These are IDirect3D9Surface's and a IDirect3D9Texture.
In this case, the reset sequence will look like this:

void D3D::resetD3D() {
// Saveable resources in D3DPOOL_MANAGED
font->OnLostDevice();
FX->OnLostDevice();

// Unsavable resources that don't have a backup
ShadowTex->Release();
ShadowTexTopSurface->Release();
ShadowDepthTopSurface->Release();

// Let's throw everything away
d3ddev->Reset(&d3dpp);

// And copy the CPU RAM resources to GPU RAM
font->OnResetDevice();
FX->OnResetDevice();

// Recreate D3DPOOL_DEFAULT stuff
initD3D(1);
}

I hope this will be clear enough, and if not, tell me!

Tuesday, March 29, 2011

[Direct3D HLSL] Normal Mapping tutorial

For an explanation about why to use tangent space, read this tidbit of text.


Let's assume we're using Direct3D and HLSL.

Converting to Tangent (or texture) space
Normals stored in the texture are surface orientation dependent and are stored in what's called Tangent Space. But all the other lighting components such as view direction are supplied in world space. Because we can't use world space, why not convert every lighting component we need to compare the normal with, to this format called tangent space? Why not compare apples to apples?

Changing coordinate systems requires transformation. I'll just skip the hardcore math, but what I do want to explain here is that we need a matrix to transform world to tangent space. Just like we need a matrix to get world space from object space, we need a matrix to convert to tangent space. Remember this:
  • We need the surface orientation, because that's where the texture normals depend on.
  • We know everything about our surface (a triangle).
  • Any lighting component we need in PS (lightdir,viewdir,surfacedir) needs to be multiplied by the resulting matrix.
/* We need 3 triangle corner positions, 3 triangle texture coordinates and a normal. Tangent and bitangent are the variables we're constructing */


// Determine surface orientation by calculating triangles edges
D3DXVECTOR3 edge1 = pos2 - pos1;
D3DXVECTOR3 edge2 = pos3 - pos1;
D3DXVec3Normalize(&edge1, &edge1);
D3DXVec3Normalize(&edge2, &edge2);

// Do the same in texture space
D3DXVECTOR2 texEdge1 = tex2 - tex1;
D3DXVECTOR2 texEdge2 = tex3 - tex1;
D3DXVec2Normalize(&texEdge1, &texEdge1);
D3DXVec2Normalize(&texEdge2, &texEdge2);

// A determinant returns the orientation of the surface
float det = (texEdge1.x * texEdge2.y) - (texEdge1.y * texEdge2.x);

// Account for imprecision
D3DXVECTOR3 bitangenttest;
if(fabsf(det) < 1e-6f) {

// Equal to zero (almost) means the surface lies flat on its back
tangent.x = 1.0f;
tangent.y = 0.0f;
tangent.z = 0.0f;

bitangenttest.x = 0.0f;
bitangenttest.y = 0.0f;
bitangenttest.z = 1.0f;
} else {
det = 1.0f / det;

tangent.x = (texEdge2.y * edge1.x - texEdge1.y * edge2.x) * det;
tangent.y = (texEdge2.y * edge1.y - texEdge1.y * edge2.y) * det;
tangent.z = (texEdge2.y * edge1.z - texEdge1.y * edge2.z) * det;

bitangenttest.x = (-texEdge2.x * edge1.x + texEdge1.x * edge2.x) * det;
bitangenttest.y = (-texEdge2.x * edge1.y + texEdge1.x * edge2.y) * det;
bitangenttest.z = (-texEdge2.x * edge1.z + texEdge1.x * edge2.z) * det;

D3DXVec3Normalize(&tangent, &tangent);
D3DXVec3Normalize(&bitangenttest, &bitangenttest);
}

// As the bitangent equals to the cross product between the normal and the tangent running along the surface, calculate it
D3DXVec3Cross(&bitangent, &normal, &tangent);

// Since we don't know if we must negate it, compare it with our computed one above
float crossinv = (D3DXVec3Dot(&bitangent, &bitangenttest) < 0.0f) ? -1.0f : 1.0f;
bitangent *= crossinv;

/* and add it to our model buffers */

We need to create a 3x3 matrix to be able to use it to convert object normals to surface-relative ones. This matrix should be built by adding the three components up in a matrix, and then transposing it in de Vertex Shader:

// tangentin, binormalin and normalin are 3D vectors supplied by the CPU
float3x3 tbnmatrix = transpose(float3x3(tangentin,binormalin,normalin));

// then multiply any vector we need in tangent space (the ones to be compared to
// the normal in the texture). For example, the light direction:
float3 lightdirtangent = mul(lightdir,tbnmatrix);

Then we're almost done. The only thing we need to do now is pass all the converted stuff to the Pixel Shader. Inside the same Pixel Shader retrieve the normal from the texture. Now you're supposed to end up with for example the light direction in tangent space. Then do your lighting calculations as you would always do, with the only exception being the source of the normal:

// we're inside a Pixel Shader now
// texture coordinates are equal to the ones used for the diffuse color map
float3 normal = tex2D(normalmapsampler,coordin);


// color is stored in the [0,1] range (0 - 255), but we want our normals to be
// in the range op [-1,1].
// solution: multiply them by 2 (yields [0,2]) and substract one (yields [-1,1]).
normal = 2.0f*normal-1.0f;


// now that we've got our normal to work with, obtain (for example) lightdir 
// for Phong shading
// lightdirtangentin is the same vector as lightdir in the VS around 
// 20 lines above
float3 lightdir = normalize(lightdirtangentin);


/* use the variables as you would always do with your favourite lighting model */

Why to use tangent space

You might've been wondering why you see lots of people doing their vector calculations in what they call texture or tangent space. Why can't they just do it in World space for example?

Well, because they want their special texture maps to be portable.

Let's take normals for example: 3D vectors which can be stored in textures to provide detail normals for every pixel on a texture (texel). Textures which store normals are called normal or bump maps. Here's an example of a normal map of a brick wall:

This image has three channels: R, G and B. They're used to store the X, Y and Z amount of a normal that's supposed to be at that given texel. This normal can be used to change surface lighting without having to add geometry. The only downside is that the object will still look flat from a side: it's just a trick to change lighting response, not to add actual depth. Lighting effects are changed because these normals are used in the color calculations, not the linear ones passed by the Vertex Shader.

Now about the colors: red equals to normals pointing along (tangent to) the surface, green equals to normals pointing left (bitangent to) and blue equals to normals pointing up away from the surface.

A pure blue (0,0,255) pixel (the perfect surface normal) will be our test subject.

Let's say we were using this vector as a world space normal. That would work perfectly fine for a surface lying flat on its back. The texture reader would read (0,0,255) and determine the current normal pointing 100% up in World space. Then imagine an object on its belly with this texture. The GPU reading the texture will still read (0,0,255) believing the normal is still pointing up in World space. This is not the case, since the object itself has rotated. Oops.

Looks like we can't just pluck world normals out of a texture, because world normals are object orientation dependant. The normals are relative to the surface the texture is applied on. So, we need to know surface orientation to be able to use these normals. There's no way to store portable world normals in a texture.

But there's always hope: just convert your data which is in stored in World Space to Tangent space.

Sunday, March 27, 2011

Introduction

Hello fellows from all over the world.

I've decided to start a blog about my own little 3D Engine I've started making.

Why a 3D Engine you might ask? Well, I got bored a while ago. Bored with all the PHP and Access shite at school. Sounds familiar eh?

I just wanted to know how the 3D stuff of all these epic games worked, and well, I just started creating my own. Just as simple as that, start your own, you might think. Well, it is not.

It's just called 'Engine' for now, and it will do for now. Enough for the personal stuff, lets race ahead to my actual latest version (I started making this blog a tad too late).